Godox V850 / Neewer TT850 in a Westcott Apollo Softbox

I had a comment on my previous blog post about the Godox V850 / Neewer TT850 flash and the ability to use High Speed Sync. It was suggested that maybe I could use two of them and that might add some additional light. That seemed reasonable, so I tried that today. I used the Westcott Apollo Softbox and a 3 flash bracket. I shot some video footage as well of the session and I’ve put together a little behind the scenes video to show the setup and what I did.

screengrab

So I had two of the Neewer TT850 flashes in a 28″ Westcott Apollo Softbox, Triggered with the Cells-IIC Trigger

Engagement Photos Engagement Photos Engagement Photos Engagement Photos Engagement Photos

Godox V850/Neewer TT850 Speedlights with HSS vs Alienbee Strobes with ND Filters – Real world results

For my most recent wedding, I had an interesting problem.  This was a destination wedding in Washington, D.C. and I was put up in a hotel not anywhere near the venue. For wedding receptions, I typically light the dance floor with some cross-lit strobes.  My go-to setup is 2 Alienbee B1600’s at 1/16th power on C-Stands.  I typically just roll the truck up to the venue, unload that gear and setup.  For this wedding, however, I was having to plan for not having the truck at the venue, and having to schlep whatever I had back to the hotel via walking and the Metro train system.  Certainly, for planning purposes, my typical setup was out.

I had read an article about these Godox V850 / Neewer TT850 units when they were announced, so I did some additional research and ended up buying 2 of the Neewer TT850’s for this reception.  I bought these because of the Lithium battery packs and the promise of 600+ shots at full power on a charge.  I did end up using these at the wedding and sure enough, they worked great for that setup.  I shot them at 1/8 power and many many hundreds of shots throughout the entire reception later I took them down and they both still read 3/3 battery bars.  Awesome!  I did have one overheat at one point, so that was the only issue.  I was during a really rapid fire session where i had a camera going, I had given my lighting assistant a camera and I also lent a pocket wizard to a guest to give them a go and we were all firing like mad.

Anyway, that’s just background on how I ended up with these flashes – it was pretty much just for the Lithium Ion battery and the portability of the units.  I did not even realize until later that these units did something equally as awesome – High Speed Sync.  You have to have the Cells IIC trigger to do it, but these units will trigger remotely up to the 1/8000s depending on camera model.  Once I found this out, I immediately obtained the required triggers and receivers to give it a test.

I ended up doing two different senior portrait / graduation sessions in the span of a week and analyzing those results is the purpose of this post.  These two sessions were at about the same time of day, similar subjects, similar or exactly the same locations.

For the first session, I used my go to setup to do outdoor portraits in the direct sun/daylight:  The Alienbee ABR800 / 30″ Moon Unit / Vagabond Mini / Triggered with Pocket Wizards.  Not the lightest setup, but it could be worse.  I had the light mounted in this case on a paint pole and Kacey Pole adapter.  This is my typical setup if I have a lighting assistant, or I can mount this to a C-Stand and lug it around.  In this case, I had 2 seniors getting shots, so I asked them to take turns being the voice activated light stand.

Alienbee ABR800 with moon unit

For the second session 8 days later, I had planned on repeating the exact same setup.  I realized, however, that I had forgotten the vagabond mini, having left it on the charger.  I did have time to go back and get it, but I decided to try out the new item in my bag of tricks, the Neewer TT850 flashes with the Cells IIC triggers using High Speed Sync.  The reason why this is interesting to me, is that I use the other setup with the Alienbee with ND filters on my lens to combat the X-Sync Speed of my Canon 5D mark III.  This camera and pretty much all of your other available DSLR bodies have a maximum sync speed of something like 1/200s.  I like to use wide aperture lenses at wide apertures and combine that with the strobes.  Doing that in bright conditions gives a problem – there’s too much light for the wide aperture I want and the maximum shutter speed of 1/200s.  I also use a powerful strobe like the ABR800 because at 1/200s and trying to match (or even beat) the ambient light, you need a good amount of kick.  The ABR800 absolutely gives you that.  This setup, while not very heavy, is a tad cumbersome.  You’ve got the vagabond mini to carry around (which I won’t complain about, try the vagabond II sometime) and a studio strobe which is top heavy.

Long story short, a speed light and a shoot through umbrella is a much more compact and light weight alterative, and I won’t have to do ND filters!  At fast shutter speeds to knock dwn the ambient, the theory goes that the flash should be able to start to match the ambient, even just a little speed light.  The problem is, doing high speed sync, you lose a lot of the potential power of the speed light.  I’m going to compare the results of both setups here.  I didn’t shoot these sessions with this article in mind, but once I started looking at the images, it struck me that a little comparison might be possible.  Therefore, the images aren’t shot at the exact same conditions and this isn’t a very scientific test.

Untitled-1For my first comparison, I’ve got the usual setup on the left, the Alienbee ABR800 with the Moon unit, the lens with a 3 F-Stop filter and the shutter speed at 1/200s.    On the right is the new setup, the Neewer TT850 with a shoot through umbrella and no ND filter, a high shutter speed with HSS provided by the Cells-IIC trigger.

Things I’ll note, we’ve got a wider coverage of the subject with the ABR800.  The ABR800 was positioned about 6 feet away.  The Umbrella had to be just out of the frame, something like 3 feet from the subject.  The TT850 was at full power the entire day, the ABR800 was moved up and down, typically pretty low like 1/4 power or less.  Sorry, I didn’t record the power settings, I wasn’t planning on making this review when I shot the photos.

So, definitely the ABR800 puts out a lot more light.  It really lit up my subject on the left.  On the right with the TT850, I got the face and upper body well.  Overall,  I do like the TT850’s image.  It probably really helps that the light was closer and that gave some softer light.  So, this is definitely not a 1:1 comparison, but had I put the TT850 at the same distance, I would not have gotten good fill.

Untitled-2For our second comparison, it’s more of a similar shot.  On the left, you can see that more of the body and the legs got light on them, much more even of coverage.  Again, the Alienbee setup was several additional feet away from the subject.  The TT850 with the umbrella had to be right out of the frame.  This also made it so I could not get the entire old well in the shot with the speed light.

I do like the results of both shots though.  Getting closer to the subject with that wide aperture really threw that background into flowery bokeh heaven.

Untitled-3Group shots is where the TT850 setup falls down.  I had more than enough light to light my subjects with the ABR800 and not really enough on the TT850.  Just not enough oomph.

Graduation PhotosHere’s one with the Neewer TT850 for a head shot.  Now this is where this setup works great!  ( 1/1000s, f/2.0, ISO 100, 85mm f/1.2 L II, High Speed Sync).

So, what’s my conclusion?  If I’m going to go and shoot one subject, and want to travel light and not mess with ND filters and use HSS, the Neewer TT850 with a light modifier like a shoot through umbrella will work great.  For groups or even in some instances full body shots, it just wasn’t up to what the other setup with an Alienbee ABR800 and a moon unit with ND filters can do.  I’m certainly going to experiment more with the TT850.  I’m also highly interested in what the Godox Wistro AD360 can do.  That unit is supposed to have a lot more power and can also do the HSS with the same triggers.  Either way, for a very compact, light weight setup that can start to compete with the sun in bright daylight, the TT850 and Cells IIC with High Speed Sync is a possible solution.

Sigma 50mm f/1.4 Art lens available for Pre-order

Today is an exciting day for DSLR photographers!  The Sigma 50mm f/1.4 Art lens has had its pricing announced and is now available for preorder.  This lens is one that I’ve been quite excited about since the announcement several months ago.

The 50mm space is a really interesting one that up until recently has not had an excellent choice to pick from.  I currently have the Canon EF 50mm f/1.4 USM lens
and I also have a circa 1960’s copy of the Canon FL 55mm f/1.2 that I have used an Ed Mika conversion kit to make it work (manual focus only) on the EOS system.  Neither of these choices are awesome at all, especially wide open or even close to wide open.  They are not very sharp and just have a myriad of problems until at least f/2.8.

I also have not picked up a copy of the Canon EF 50mm f/1.2 L  lens.  This lens has a lot of issues like the well documented Focus Shift problem as well as the sharpness.  For the price that Canon wants for this lens, I’d expect it to be of higher quality.

Last year, the good folks at Carl Zeiss made huge news with their uncompromising Zeiss 55mm f/1.4 Otus Lens.  This lens compromised on nothing including price.  It goes for north of $4000.00.  Ouch.  It’s a beast though, and I recommend this youtube video for your enjoyment.  There were two problems with this lens, one was price, the other was it is only available in the manual focus variety.  I do tend to “dial in” all of my wide open shots manually though, so that’s not a total deal breaker.  $4000 was the biggest problem, but I was at least seriously thinking about it nonetheless.  At the very least, here was a lens that had the quality going for it.

This all changed when Sigma made their press release this past January.  Sigma recently has retooled their lens lineup to different categories.  I’m specifically interested in their “Art” lenses, which so far have been nothing but awesome.  I also own the Sigma 35mm Art Lens  and have been nothing but happy with the results.  Today is the day that they announced the price and some outlets started pre-ordering for the 50 f/1.4 Art lens.  I have placed my order.

Just to show some visual, here’s some graphs from the SlrGear folks.  This is a great website to research lenses before you buy.

50mmcomparisonUpper left is the new Sigma f/1.4 Art (~$950).  Upper right is the Canon EF 50mm f/1.2 L (~$1600)
, Lower left is the Zeiss 55 f/1.4 Otus (~$4000) and lower right is the Canon EOS 50 f/1.4. (~$400)  This set of graphs show sharpness.  I’ve put them all wide open at f/1.4, except fort the Canon f/1.2 which is stopped down to f/1.4 (which in theory should give the Canon a slight advantage here).  How to read these is that the lower the value, the sharper.  The graph represents the frame of the image taken, so the corners of the graph are the corners of the frame.  It’s amazing to me how bad the Canon offerings are.  The 50 f/1.4 is really terrible, and the L series Canon f/1.2,  for an L series (the highest quality lenses Canon makes), is just embarrassing.

To stress the point, here’s the graph, wide open at f/1.2, of the highly acclaimed Canon EF 85mm f1.2L II
(Which I own).

8512L

That’s what an L lens that commands high dollars should look like!

The Zeiss otus on the other hand, is just unbelievable, 1-2 blur units across the entire frame including corners.  At $4000, it had better be.

Now the new lens that I’m talking about is the upper left.  Is it as sharp as the Zeiss?  No, but it’s really close.  You’ve got under 2 blur units in the center and just up to 4 in the far corners, and this is wide open.  The full review of this lens at SLRGear does show some CA wide open in test shots.  It’s hard to make a case to justify the Zeiss over this Sigma, but possible.  I can’t really imagine making a case that the Canon 1.2 L is a better choice than the Sigma though, especially given that the Sigma is so much lower in cost!

Either way, this is the kind of performance I’ve been looking for in a 50mm lens!  I’m very excited to get this lens in my hands and make some photos with it.  I will certainly post some samples when I get this.


Speeding up your interaction with Adobe Lightroom

A common complaint or problem with Adobe Lightroom is the speed in which the zoom in takes to see all of the pixels on your screen. One way to drastically increase the speed of this is to ask Lightroom to render 1:1 preview files. When you do that, Adobe will then not have to do the heavy lifting real time while you are interacting with the software and just display the information to you. The trade off is that it takes that time when you ask it to render these 1:1 previews and it costs disk space. The up side is that you can do this when you want – either at the time of import or at another time of your choosing. If you’re able to walk away while the import takes place (or say, walk to your bed and pass out after a day of shooting) then your experience with Lightroom will be greatly enhanced. You can also do it from the Library menu. Once you are done with your interaction with your set in Lightroom, you can then recover the disk space by discarding the previews.

To do this during the import process, at the import dialog in the upper right hand corner select Render Previews -> 1:1.

Rendering 1:1 previews on Import

To do it later, in the Library mode select the images you want, go Library -> Previews -> Render 1:1 Previews.

Rendering 1:1 previews in Library Mode

To discard them, again in Library mode select the images you want, go Library -> Previews -> Discard 1:1 Previews.

Try it – you will be surprised how much “snappier” LR will seem!

Using your Adobe Lightroom 3 Presets in Lightroom 4

Using Ligtroom 3 Presets in Lightroom 4
Here’s a tip that many Lightroom users will appreciate.  If you have an extensive set of Lightroom 3 presets, you might be worried about your transition to Lightroom 4, as the sliders have all changed rendering most of the presets that you have created or obtained for Lightroom 3 useless and broken.

Here’s the solution to this issue.  Import your photos into Lightroom 4.  In the develop module under settings -> process you can change the process type from 2012 to 2010.  When you do that, all of the sliders and everything else reverts back to Lightroom 3 functionality and all of the presets work as expected.  You can do this on a virtual copy of an image as well.  You can also copy this change and paste it to many photos.


Cary, NC – Senior Portrait Session – Studio Photography

Senior portrait session that I shot today at The Veritas Studio.  I used the 5D mark III with an Eye-Fi card and a new iPad to let the client have a live preview of the photos.  See the video below for a demonstration on how this works.

Senior Portrait Session - Cary, NC

Senior Portrait Session - Cary, NC

Senior Portrait Session - Cary, NC

Senior Portrait Session - Cary, NC

Senior Portrait Session - Cary, NC
Senior Portrait Session – Cary, NC
Senior Portrait Session - Cary, NC

Senior Portrait Session - Cary, NCSenior Portrait Session - Cary, NCSenior Portrait Session - Cary, NC

Transcript –

Hey, this is Chris with FlorioPics.com and today I’m here at The VERITAS Studio to do a senior portrait session. I got a new 5D mark III camera that just came out and I also have an Eye-Fi X2 SD card and an iPad 3. So one feature of the 5D mark III that is very important for what I’m going to show you today is the fact that it has two slots for cards; One being a CF card slot and then the other being an SD card slot. So, it has two slots. What you want to do is have small sized jpegs be saved to your Eye-Fi card and raw files be saved to the CF card. How you set this up is you go to your menu system. The first menu item on the first page is your image quality. Before you can edit this where each card has a different file type independently of each other, you go to the wrench menu Record func+card/folder menu. I’ve chosen “Record Separately”.

I’m here with my clients that are having a Senior portrait today, and I’m going to hand my iPad to the Mom who will watch the photoshoot and see the photos live through the Eye-Fi app on the iPad. What I have found is that if you give the iPad to your client, they have something to do while the photoshoot is going on. They will be more familiar with the photos when it comes time to review them and order prints or products and they can make changes to wardrobe and other looks while the photoshoot is going on – it’s much easier to do it now rather than later. Well that’s it, thanks for watching my video. Be sure to go to Facebook and hit like as well as check out my website: FlorioPics.com

The benefits of shooting in the RAW format

I am currently involved in an internet conversation between photographers in the Raleigh/Durham area on the benefits of shooting photos in the RAW vs JPEG formats.  I must apologize in advance, as this post is going to get fairly technical, very quickly.  I must also state that I am absolutely NOT in any way providing any ground-breaking information or anything that isn’t already widely known, but I have been “called out” to demonstrate in my own experience why it is best to shoot in the RAW format.

Just to get everyone up to speed, the average Digital SLR in the year 2012 can shoot both a RAW and JPEG format.  Let’s start with the easier one to understand, the JPEG format.  The JPEG format has been around for years, according to the JPEG wiki page, since 1992 (it seems like even earlier, at least to me).  Standard JPEG files store color information in 8 bits per channel, which equates to 16.8 Million colors.  Every time (including the first time, if you are shooting JPEG in the camera) a JPEG file is saved, an algorithm is run to throw away data in an effort to save space and make a smaller file.  This is a “lossy” algorithm, in that data is irretrievably thrown away during this process.

The RAW formats are all manufacturer proprietary formats, despite the efforts by companies such as Adobe to try and push a standard format.  As a history lesson, when the first DSLR cameras came out, the manufacturers wanted you to use their software to open their files and convert them to usable formats such as TIFF.  You see, the RAW files that come out of DSLR’s are a dump of the information that the sensor sees at the time of the image capture.  Things like white balance, contrast, color space, sharpening, etc are NOT applied to the raw data that is in the RAW file.  Those settings that the camera is set to are, however, saved in the RAW file, but not not applied.  One way to think about it is the camera settings are “hints” that are left in the RAW file, kind of as a starting place for your RAW converter.  In order to actually open a RAW file, one must convert it.  In the early days, you either used the software that the camera came with, or you used some hacks that were around that reverse engineered the formats.  These days, (I think) the camera manufacturers actually work with companies like Apple and Adobe to have 3rd party integration of the raw converters into their software, as well as still providing a software program that will convert the files with the camera.  I still remember the distinct pain in the rear it was to work with raw files and older-than Photoshop CS (such as Photoshop 7, which was crippled in editing anything with a larger than 8 bit per channel color space).  RAW files store their color space in a 16 bit space, but most DSLR’s don’t use all of it.  The camera that I utilize as my primary camera is the Canon 5D II, which uses 14 of the 16 bits of space.  This gives 16384 colors per channel (there’s 3 channels, Red, Green, Blue).  So, the JPEG has 16.8 Million colors, a Raw file from a 5D II can record up to 4.3 Trillion colors.

Can you actually SEE the difference between 16.8 Million colors and 4.3 Trillion?  No way, Jose.  So why do I care?  The answer is, it’s all in the edit, and also in the final use.  I used to set my Canon 5D II in the “RAW + JPEG”, and to show an example of why I do this, I pulled an image from the time period when I did shoot in this way.  Just as background info, I used to shoot RAW + JPEG because I thought the time that Lightroom took to manipulate images might be sped up having both files.  I have come to the conclusion that it either doesn’t speed up, or that it doesn’t do so in a discernible way, so I just shoot RAW only these days.

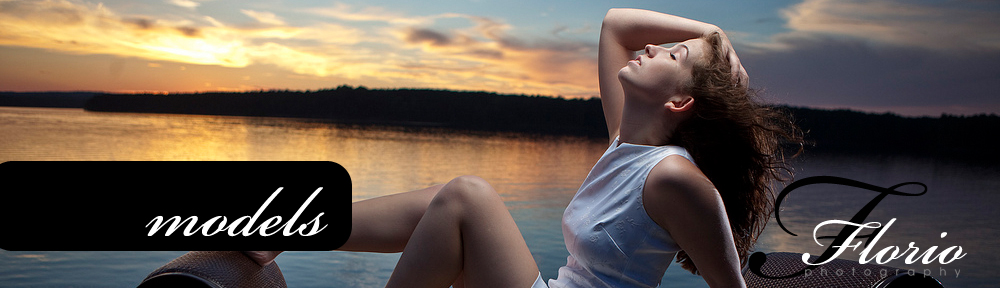
This image is from my 365 project, back on May 25th, 2010.  In this image, I over-exposed the subject somewhat and had to pull information in post processing to make it look better.  Had I just shot in the JPEG format, there would not have been enough detail left in the color information in this image to “fix it” satisfactorily.  There was, however, enough data left in the RAW file to help me out in the post processing.  Luckily, I shot in both the RAW and JPEG format in the camera, so I can use this image as the example in this blog post.

Here’s the finished image, as I finished it for you post during the 365:

The right side of the image had a strobe which created a gigantic amount of flare and also the exposure of that side of the model’s body, especially the arm, was very close to completely blown out.  By blown out, I mean that the pixel’s colors would be pure white, thus devoid of details.  In the JPEG version saved by the camera, that area of the model’s arm is indeed blown out in 2 of the 3 color channels.  I have pulled these files into photoshop and using the curves tool you can see the clipping, which is another way to say blown out.

See in the image above, that photoshop reports clipping in the skin details of the subject in one channel, and in two channels on the arm area.

It is apparent here below visibly as well on the jpeg file (which was saved and just opened in photoshop, no changes made).

Without making any adjustments in photoshop, besides opening (which does apply adjustments by definition), the RAW file from the camera shows much less clipping (blowing out):

Notice how the face, and the arm except for the “rim light” on the edge is black here, which indicates that there is data to be used.  Even with no adjusting, you can just see that there is more data, see below:

After manipulation, we get a usable arm and the face has details using the raw file.  Had I not shot in the RAW format, I would not have been able to have nearly the quality output as what I had.

Using RAW is not just valuable in the edge cases like this, you also get to adjust the white balance, contrast, sharpening at your leisure (if you shoot JPEG in the camera, those settings are “baked into” the image, and there’s no adjusting after the fact).  You also have every pixel to use, whereas with JPEG, you have a compressed file where much of the data is completely lost to the great bit bucket in the sky.

I shoot RAW and convert later, because it is much easier than it used to be.  Long gone are the days where we are tied to the Canon converter or using reversed-engineered hacks.  Adobe has integrated the raw converter into Photoshop since Photoshop CS and they also have an amazing product in Adobe Lightroom.  Lightroom lets me import the RAW files, make adjustments and then output JPEGS with great ease and speed.  If this were still the year 2000, in the days when computers had less ram, less processor speed and power, less cores and hard disks didn’t top out in the multiples of Terabytes, then the argument could be made that shooting JPEG, for most situations, might be OK.  That time is over, the computers these days, both hardware and software, slice through the RAW files with great speed, and the latitude that you keep by shooting in RAW is worth every 1 and 0 they occupy on my hard disks.  I care too much about the photographs that I shoot to not have the highest quality photos at the end of the day.